So rather than a checkout run, where you are granted open access, the training process for ebeam lithography is a more gradual transition, where we work together at first, scoping out the needs for your project and doing early exposures, and then over time, as you gain understanding, confidence and capability with the system, you will be allowed to do more on your own.
For some users, such as those with low volume and infrequent needs, it may be more efficient to work with me in an ongoing basis, rather than invest the time to become a solo operator; this option exists for E-Beam Lithography, while it doesn't for most other equipment.
If you would like to discuss training options for the system, contact me and we can discuss your needs.
Before you do, though, it would be helpful for you to be aware of a few background requirements for most users.
First, here’s my attempt at a Process Map to show the steps in a successful e-beam write. There are a lot of complex issues, but you really have to be able to address all of these before you can get a successful exposure. To help you get started, I recommend that you:
A) Take a look around this website. There's a lot of information here, but it is also still a work-in-progress. You will find holes and placeholders and notes-to-myself scattered throughout; I’m actively working on fleshing out details, but if there are particular subjects that I haven’t gotten to yet that you’d really like to see covered here, let me know, and I can try to work on those areas next.
B) Get trained in the prerequisite activities. You will need to be:
- A UW WNF user with keycard access to the cleanroom, and an enabled Coral account
- Trained & Qualified on using the WNF chemical wet benches, so you can spin & develop e-beam resist. You’ll need to use resists, developers, and strippers (solvent and bases). You’ll need to use the resist spinners, the baking hot plates, and general wet chemistry hoods.
- Trained & Qualified to use a resist spinner. There is a now a small hood and spinner for the exclusive use of users spinning e-beam resist, identified in Coral as SPIN3-EBeam.
- Trained & Qualified to use an Optical Microscope at WNF. You’ll pretty much always look at your patterns with an optical microscope, so you should be skilled at using one or more of the optical microscopes in the WNF (Leica, Nikon, or Zeiss).
- Trained, Qualified, and Experienced using an SEM. The WNF has a JEOL JSM-7400F high-resolution, cold-field-emitter SEM, located just outside the door to the e-beam room. Conveniently enough for you (or not), I’m handling ownership, operation, and training on that system as well. If you’re using e-beam lithography, it is almost certain that what you are exposing is going to be too small to fully assess using optical microscopy, so you should be skilled with using an SEM. In addition, the manual beam calibration steps when operating the JEOL are very similar to obtaining a high-quality SEM image, (only more difficult, actually) so the more experience you have with high-resolution, high-quality SEM, the better your e-beam results will be. In particular, you may need to adjust the e-beam focus and astigmatism manually on the e-beam system, just like with an SEM, so this skill is absolutely essential.
- Skilled with some experience at basic WNF photolithography. It’s strongly recommended that you have some experience with photolithography, and interpreting the results of your work with an optical microscope. I also strongly recommend that you actually have some experience doing your own photolithography processing, and I’d recommend you try to explore the processing a bit yourself. For example, learn to identify effects of underexposure vs overexposure, under-develop vs over-develop. These are all much easier, faster, and cheaper to learn with optical lithography than with e-beam. And by experience, I mean actual, hands-on, I-did-it-myself type of experience. Watching someone else do the work isn’t going to give you the same sort of learning that actually doing the work will. And I’m not going to teach you the basics, there just isn’t enough time in the day and night.
C) Get in touch with me so we can sit down and talk about your project, and we can plan your path toward qualification.
What to Expect During Training
With simple tools, training and certification is typically a two-step process:
1) The equipment trainer leads a training session, in which they discuss the equipment and demonstrate the operation, often with a small group.
2) "Check-out", in which the trainee runs the equipment independently under the supervision of the trainer. Assuming safe and successful operation, the trainee is qualified to operate that equipment independently.
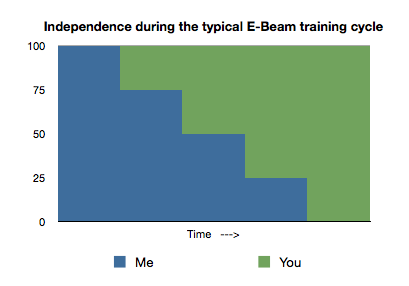
By comparison, E-Beam is very complex, in many ways: the flexibility and options during job setup, the complexity of setup and calibration, the highly-variable priorities and trade-offs during operation, the wide range of process variables. Taken together, the path to e-beam checkout is a bit longer. Instead of a single binary step, it might look a bit more like this diagram, in which it takes multiple steps toward independent operation, with most operators learning incrementally over 4-6 runs. This depends largely on your experience, and how much effort you put in. This also depends somewhat on the complexity of your task. For example, I strongly recommend that a first exposure be a single-layer (non-aligned) exposure, in which you learn this simpler case of tool operation before adding the considerable complexity of alignment to the mix.

E-Beam training a multi-step process, not as binary as simpler equipment and processes.
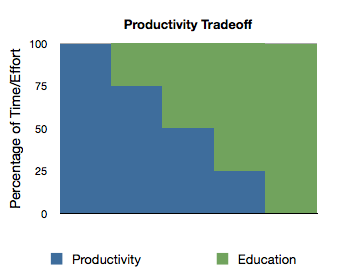
There is another dimension to the training period -- another tradeoff to be made. I call this one the "Productivity Tradeoff", and I diagram this below. The trade-off here is how quickly you want to learn to be independent, and how quickly you want to get your first successful sample. There is a trade-off here. If you prioritize getting your sample as fast as possible, the best way to that is for me to drive the first setup and exposure as quickly as possible. You'll get your wafer, but not much education. On the other hand, if you have time, we can step very slowly through every step, decision, and trade-off of the setup, preparation, and calibration steps, but the time to your first wafer will be much longer.

You will drive how we allocate time during training, but there is a trade-off between learning to be independent and getting your desired sample faster.
Most commonly, we work somewhere in the middle of those two extremes, balancing productivity with education. I'll work with you for a while, maybe a few hours, but then we switch over to "productivity" and just run your sample. This seems to work best for most people; it allows the learning to be incremental and backed by the experience of seeing the results and iterating. This is particularly true with new and experimental processes where I often can't even tell you the best methods to use; we may have to do some experimentation and characterization to find the best operating parameters. When you are brand new to the e-beam field, this can all be very dazzling and confusing, so it make best sense to work in smaller steps toward the end goal. The main point here is that to a large extent, YOU will drive this trade-off. When we start, I will ask you how fast you want to work and where on the balance of getting work out versus learning to be independent more quickly you would like to be, and that's how we'll proceed.
